Loading...

Home  |  About Us  |  Pricing & Turnaround Time  |  Our Guarantee  |  Testimonials  |  Shipping  |  Payments  |  Links  |  Contact Us  |  303-745-9422
Menu of Gem Cutting Services.

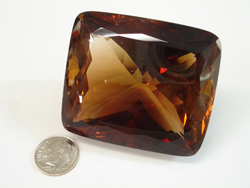
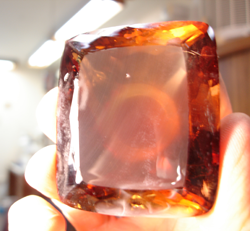
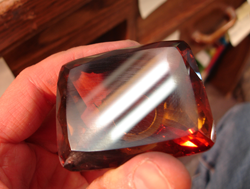
Repairing the Table of a 850 carat Imperial Topaz

Video of a large Topaz.

Click for Video of Topaz

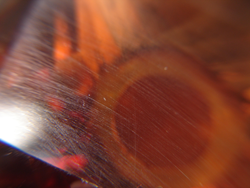
A gem dealer sent me this large Topaz which had been damaged on the table. It could not be sold in this condition and needed to be reparied.

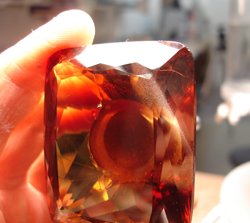
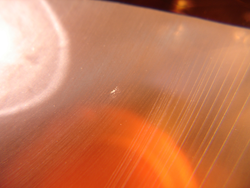
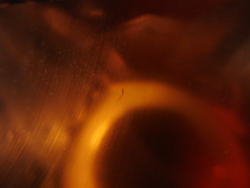
Something had struck the table of the Topaz which created a white spot on the surface of the stone where the material had been 'crushed'. This causes tiny fractures which extend down into the stone.

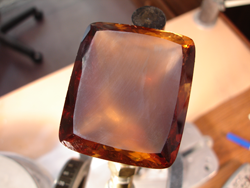
Repairing such a large table is extremely difficult. This project would prove to be quite a challenge for me.

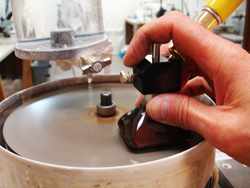
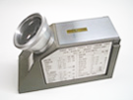
To do this project I needed to order a fresh new and sharp cutting lap to take down the table to get 'under' all of the tiny fractures.

Below, you will see photos and a description of the cutting process.

Large cushion cut 850 carat Imperial Topaz next to a dime.

850 carat faceted Topaz with
damage to the table facet

This photo of the Topaz next to the dime gives you an idea of the size of this gemstone.

An arrow pointint to the left to click on the photo to make it larger.

When you click on the photo, in the larger photo you will see a white spot on the left side of the table. This is the impact chip damage.

I am holding the stone at a different angle which shows the chip in the table of the stone.

View of the chip

At this angle it is a little easier to see the damage to the table.

A close-up shot showing the chip which is actually spot on the table which has been hit very hard and crushed the surface about 3 mm wide.

Closeup of the Chip

This is a closeup photo of the impact damage. The white indicates that the Topaz is crushed. You also see radiating micro-fractures which must be removed.

To get 'under' those fractured, which go in deep, I will have to take the table down more than 1mm. Maybe close to 2mm. That is very difficult on such a large surface.

Shows the device which holds the stone to keep it straight while it is being glued.

Dopping the stone

This photo shows how I am holding the Topaz in place while I Epoxy it to a large dop stick.

Me ing the stone on the flat wheel of my faceting machine.

Taking down the Table

Here I am holding down the table on a new diamond lap.

Because the table is so large, this step alone takes several hours.

You will see the slow progress in the next 4 photos.

Shows the surface of the table of the Topaz which has been ed and the chip if still there.

Early progress

Here you can see what the table looks like in the early stages of sanding. You can clearly see the white damaged area.

This shows the chip has gotten much smaller as I continue to  the table down.

Taking the table down farther

You can now see that the chip has gotten much smaller.

The chip has gotten much smaller.

The Chip on the Topaz is now much smaller

In the middle of this photo you can see a much smaller round chip and a curved fracture that looks like  -->  )

The chip is not very tiny and looks like a thin comma.

The chip is almost gone

The only remaining part of the damage is now a very tiny fracture shaped like   )

It can still take a while to take out the remaining tiny fracture.

Even though it is so tiny it is hard to even see, I don't dare leave it in the stone because it could start to 'travel' during the polishing stage, just like the crack in a car windshieled can travel and get much larger. I must completely get rid of every bit of the tiny fracture.

The table of the stone with the chip now gone.

The chip is GONE!

The entire damage is now gone.

Now begins the harder part. The pre-polishing and polishing.

In this photo you can see I have started the pre-polish stage which will remove the sanding lines from the previous step.

I have now started the pre-polish stage and the table is slightly shiny.

Starting the polishing stage

Here you can see the surface is shinier becasue I have started the polishing stage.

I am using a new polishing lap made from space-age materials.

A close-up photo showing the deep scratches which are left from the ing stage.

Close-up of scratches in Topaz

Here you can see a close-up shot of the deep scratches which remain in the Topaz.

These can be very difficult and time consuming to polish out.

The larger the surface, the harder it is and longer it takes.

The table now looks like it is half polished

Half way polished

Here you can see that the polish is coming along nicely and I am about half way there.

At this point it is just a matter of patience and several hours of persistent polishing.

The polish is now finished and the stone is sitting next to a dime.

Finished new polished Table!

This shows the finished polished table.

Wheww! That was a lot of work.

You can see the video of the finished stone at the top of this page if you haven't already viewed it.


→  Take me back to examples of Large Gems we have Faceted


Denton Anderson,
Gemologist & Gem Cutter
click photo for Video

Photo of Denton the gem cutter.

Graduate Gemologist, GIA, GG
Over 20 years of experience.